
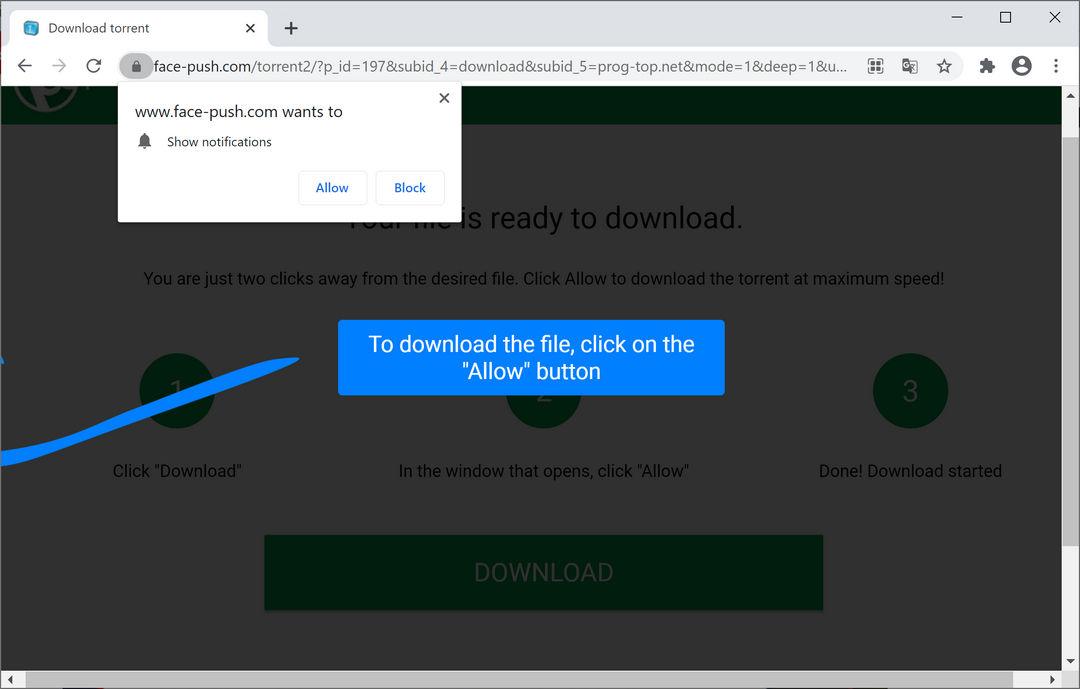
If you are concerned about your online privacy and security, it is essential to stay vigilant against potential threats. One potential threat that has been gaining attention is push subscriptions from malicious websites. These push notifications can be annoying and even dangerous, as they can lead to the spread of malware or phishing attacks. In this article, we will guide you through the process of removing push subscriptions from popular browsers such as Android, Chrome, Safari, Mozilla, and Edge in order to protect yourself from the malicious website spmurbanedating.top.

Android: On Android devices, removing push subscriptions can be done by following a few simple steps. First, go to the settings of your device and find the “Apps” or “Applications” section. Look for the browser you are using and tap on it. From there, you should see an option to “Notifications” or “Push Notifications.” Tap on this option and disable it for the browser. This will prevent any push notifications from being received.
Chrome: If you are using the Chrome browser, removing push subscriptions is quite straightforward. Go to the settings of the browser by clicking on the three dots located in the top right corner. From the menu, select “Settings” and then click on “Advanced.” Under the “Privacy and security” section, click on “Content settings.” From there, click on “Notifications” and you will see a list of websites that have push subscriptions. Find the malicious website spmurbanedating.top and click on the three dots next to it. Select “Block” to remove the push subscription.
Safari: Safari users can also remove push subscriptions easily. Open the browser and go to the Safari menu located in the top left corner. From the dropdown menu, select “Preferences.” In the preferences window, click on the “Websites” tab. On the left side, you will find “Notifications.” Click on it and you will see a list of websites with push subscriptions. Find spmurbanedating.top and click on the “Deny” button to remove the push subscription.
Mozilla Firefox: Removing push subscriptions from Mozilla Firefox is a breeze. Open the browser and click on the three horizontal lines located in the top right corner. From the dropdown menu, select “Options” and then click on “Privacy & Security” from the left-hand menu. Scroll down until you find the “Permissions” section. Click on “Settings” next to “Notifications.” In the pop-up window, you will see a list of websites with push subscriptions. Find spmurbanedating.top and click on the “Remove Website” button to eliminate the push subscription.
Microsoft Edge: Microsoft Edge users can also take steps to remove push subscriptions. Open the browser and click on the three dots located in the top right corner. From the dropdown menu, select “Settings.” Scroll down and click on “Cookies and site permissions.” Under the “Permissions” section, click on “Notifications.” You will see a list of websites with push subscriptions. Find spmurbanedating.top and click on the trash can icon to remove the push subscription.
By following these steps and removing push subscriptions from your browsers, you can protect yourself from the malicious website spmurbanedating.top and other potential threats. Remember to always stay vigilant and keep your online security a top priority.
Protect yourself from malicious websites
With an increasing number of malicious websites and online scams, it is crucial to protect yourself from potential threats. Here are some measures you can take:
- Make sure to keep your browser and operating system up to date. Developers often release security patches to address vulnerabilities that can be exploited by malicious websites.
- Install a reliable antivirus software that can detect and block malicious websites. Regularly update the antivirus software to ensure it is equipped with the latest threat definitions.
- Exercise caution when clicking on links or downloading files from websites you are unfamiliar with. It’s always better to err on the side of caution and avoid potentially risky websites.
- Avoid downloading files from unknown sources or websites that don’t have a secure connection (HTTPS). Malicious websites may use downloads as a means to infect your device with malware.
- Enable pop-up blockers in your browser settings to prevent malicious websites from displaying intrusive pop-ups or redirecting you to harmful content.
- Regularly clear your browser cache and cookies to remove any potentially harmful data that may have been stored by malicious websites.
- Consider using a virtual private network (VPN) when browsing the internet. A VPN encrypts your internet connection, making it more difficult for malicious websites to track your online activity and gather personal information.
- Be cautious while entering personal information on websites. Look for secure indicators such as a padlock symbol in the browser’s address bar or an HTTPS connection to ensure your data is being transmitted securely.
- Stay informed about the latest online threats and scams. This will help you recognize potentially malicious websites and avoid falling victim to online scams.
- If you encounter a potentially malicious website, report it to the appropriate authorities. This can help prevent others from becoming victims.
By following these precautions, you can significantly reduce the risk of encountering malicious websites and protect yourself from potential online threats.
Removing push subscriptions on Android
To protect yourself from malicious websites and unwanted push notifications, it is important to remove push subscriptions from your Android device. Follow the steps below to remove push subscriptions on Android:
Step 1: Open Settings
Tap on the “Settings” app on your Android device to open the settings menu.
Step 2: Find and select “Apps & notifications”
Scroll down and find the “Apps & notifications” option in the settings menu and tap on it.
Step 3: Select the browser
In the “Apps & notifications” menu, you will see a list of apps installed on your Android device. Look for the browser you are using, such as Chrome or Firefox, and tap on it.
Step 4: Tap on “Notifications”
Once you have selected the browser, you will see a list of options related to the app. Tap on the “Notifications” option.
Step 5: Disable push notifications
In the notifications settings for the browser, you will find a toggle switch or checkbox to disable push notifications. Toggle off the switch or uncheck the box to disable push notifications from the browser.
| Browser | Steps to remove push subscriptions |
|---|---|
| Chrome | Settings > Apps & notifications > Chrome > Notifications > Toggle off the switch |
| Firefox | Settings > Apps & notifications > Firefox > Notifications > Toggle off the switch |
| Samsung Internet | Settings > Apps & notifications > Samsung Internet > Notifications > Toggle off the switch |
Repeat steps 3-5 for any other browsers installed on your Android device to remove push subscriptions.
By following these steps, you will effectively remove push subscriptions from your Android device and protect yourself from unwanted push notifications from malicious websites.
Removing push subscriptions on Chrome
To remove push subscriptions on Chrome, follow these simple steps:
Step 1: Open Chrome settings
First, open the Chrome browser on your Android device or computer. Then, click on the three vertical dots located in the top right corner of the browser window. From the dropdown menu, select “Settings”.
Step 2: Go to Site Settings
Once you are in the Chrome settings, scroll down until you find the “Privacy and security” section. Click on it to expand the options. Then, select “Site Settings”.
Step 3: Manage push notifications
In the Site Settings menu, locate and click on the “Notifications” option. This will take you to the page where you can manage your push subscriptions.
Step 4: Remove push subscriptions
On the Notifications page, you will see a list of websites that have push notifications enabled. Scroll through the list and find the website you want to remove the push subscription from. Click on the three vertical dots next to the website name and select “Remove”.
Step 5: Confirm removal
A confirmation dialog will appear asking if you want to remove the push subscription for that website. Click “Remove” to confirm.
That’s it! You have successfully removed the push subscription for the selected website on Chrome. Repeat steps 4 and 5 for any other websites you want to remove push subscriptions from.
Note: Removing push subscriptions will disable the website’s ability to send you push notifications. If you change your mind in the future and want to enable push notifications for a specific website again, you will need to follow the same steps and select “Allow” instead of “Remove”.
Conclusion
By removing push subscriptions on Chrome, you can protect yourself from malicious websites and unwanted push notifications. It is always a good practice to regularly review and manage your push subscriptions to ensure a safe and personalized browsing experience.
Removing push subscriptions on Safari
Here are the steps to remove push subscriptions from Safari:
- Launch Safari on your Mac or iOS device.
- In the top menu, click on “Safari” and select “Preferences”.
- Go to the “Websites” tab.
- In the left sidebar, scroll down and click on “Notifications”.
- You will see a list of websites that have requested permission to send you push notifications.
- Select the website from which you want to remove the push subscription.
- Click on the “Remove” button.
- Confirm the action by clicking “Remove” again in the dialog box.
- Repeat these steps for any other websites you want to remove push subscriptions from.
By following these steps, you can easily remove push subscriptions from Safari and protect yourself from malicious websites trying to send you unwanted notifications.
Removing push subscriptions on Mozilla
If you are using Mozilla Firefox as your browser and want to remove push subscriptions, follow these steps:
- Open Mozilla Firefox on your device.
- Click on the menu icon, which is represented by three horizontal lines, located at the top-right corner of the browser window.
- In the dropdown menu, select “Options”.
- In the left sidebar, click on “Privacy & Security”.
- Scroll down to the “Permissions” section.
- Locate the “Notifications” option and click on “Settings”.
- A list of websites that have push notification subscriptions will appear.
- To remove a specific subscription, click on the website URL and then click on “Remove Site”.
- Alternatively, you can remove all push subscriptions by clicking on the “Remove All Websites” button.
By following these steps, you will be able to remove push subscriptions on Mozilla Firefox and protect yourself from malicious websites.
Removing push subscriptions on Edge
To remove push subscriptions on the Edge browser, follow these steps:
- Open the Edge browser on your Android device or computer.
- Click on the “Menu” button, which is represented by three horizontal dots in the top-right corner of the browser window.
- From the drop-down menu, select “Settings” and then click on “Site permissions.”
- In the “Site permissions” section, click on “Notifications.”
- You will see a list of websites that have push subscriptions enabled. Look for the website spmurbanedating.top and click on the three-dot button beside it.
- Click on “Remove” to remove the push subscription for that website.
- Confirm the removal by clicking on “Remove” again in the dialog box that appears.
Once you have followed these steps, the push subscription for spmurbanedating.top will be removed from your Edge browser, ensuring that you are protected from any malicious activities associated with that website.
Remember to regularly review the list of push subscriptions in your browser settings and remove any subscriptions from suspicious or unknown websites to maintain a secure online browsing experience.